Offset Tutorials
From Data Realms Wiki
(→Firearms) |
(Removed schizophrenia; DRL dev confirms the picture is correct-- only X axis inverted from normal/Cartesian.) |
| (One intermediate revision not shown) | |
Latest revision as of 12:50, 30 June 2012
Offsets are a way of positioning various things in relation to something else. A good knowledge of algebra helps. The unit of offsets is pixels.
Firearms
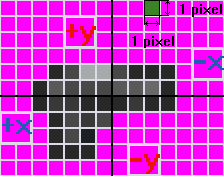
Let's start with firearms. It is a difficult thing to explain for someone without any visual aid, so here is the basic offset 'grid' that you would expect:

The first thing you'll probably notice is that the X axis is switched. Rather than -X meaning left like in the conventional grid, the kind you'll see in Algebra and the sorts, -X mean right and vice versa.
![]()
Imagine that this is your new weapon you've just sprited. You want it so that your clone will hold it properly. Meaning, you'll need to fill out these key chunks of code.
   SpriteOffset = Vector (This sets the origin of the sprite, which should be in the very middle of your sprite)
      X = ?
      Y = ?
   JointOffset = Vector (The placement of the main hand)
      X = ?
      Y = ?
   StanceOffset = Vector (The placement of the shoulder when carrying the gun)
      X = ?
      Y = ?
   SharpStanceOffset = Vector (The above but when aiming down sights)
      X = ?
      Y = ?
   SupportOffset = Vector (Placement of secondary hand)
      X = ?
      Y = ?
   Magazine = Magazine
      CopyOf = Magazine SMG
      ParentOffset = Vector (Where the magazine goes)
         X = ?
         Y = ?
   MuzzleOffset = Vector (Where the bullets fire from)
      X = ?
      Y = ?
   EjectionOffset = Vector (Where the shells, if any, eject)
      X = ?
      Y = ?
So, how are we going to find the correct coordinates?
Easily, first of all, we'll need to set the "Sprite offset". Our sprite here is 18 by 10 pixels, therefore...
   SpriteOffset = Vector
      X = -9
      Y = -5
Just take half of your sprites dimensions, negate it, and plug it in. That's all you need to know for Sprite Offsets. This bit of code will help you a lot later on. Note: If your sprite Offset has a decimal, just round it to the nearest whole. There's no such thing as half a pixel.
Now, lets move onto the Joint offset, this will be where the main hand goes, setting this one up is a bit more trickier. First, make a mark off where your Sprite offset is, which should be in the middle.

This is where we will start counting, start marking how far you want your hand to the left or right.
I counted 4.
   JointOffset = Vector
      X = 4
      Y = ?
Remember, +X means left and -X means right. Now count how much you want to go up or down.

I counted 3.
   JointOffset = Vector
      X = 4
      Y = -3
JointOffsets and Parent Offsets (Which is what we are currently working on) need to be the opposite of what we have, as we are moving the gun. So:
   JointOffset = Vector
      X = -4
      Y = 3
There, you're done. That's all you have to do to set an Offset.
Actors
now you have a basic knowledge of offsets so I will briefly go over what each offset does...
AtomGroups- Uses for feet and hands, set of invisible pixels to be attached which is basically used for traction. If you look at an Atomgroup code, you'll notice a whole bunch of coordinates, these are defining what pixel goes where from the JointOffset point.
Joint offset- On what point the sprite rotates.
Maxlength- How far the limb can reach from the JointOffset.
Limbs offsets- Defined in the AHuman code, the joint of each limb goes where.
holster offset- Unknown, think it may have something to do with where the arm reaches when switching weapons.
LimbPaths- A limb uses this path to "do" something, for example walking. It uses a series of directions.
      AddSegment = Vector
         X = 0
         Y = 2
This tells the foot or whatever it's telling to move down a bit.
